by Admin | Jun 30, 2020 | Manufacturing, Plastics, Recent Posts |
Advantages of Mold Maintenance
Injection molders around the world are striving to make their operations more efficient, and more productive. One area that is often overlooked when it comes to gaining such advantages is mold maintenance.
A well-defined and consistent mold maintenance program helps improve efficiency by ensuring the molds are ready for production when needed. A Nanoplas cleaner, when used with a rust preventative, and a grease that does not break down not only cleans the mold, but also prepares it for the next run.
While applying the cleaner, rust preventative, and grease, take the time to thoroughly inspect the mold. Doing so will give you the chance to identify problems or wear on the mold before they become significant issues. As part of your maintenance log, make a note of any concerns, address the ones you can, and track the progression of any issues you can’t fix.
When it comes time to get the mold back into production, products used to clean and prepare the mold should not be a problem or cause a delay. The Nanoplas line of products are formulated to mitigate this issue. They do not cause bleeding or startup scrap, so you can mold right through them and save time getting the production run moving.
Integrating a maintenance program as a core element into your production strategy may allow you to realize significant gains in productivity by reducing startup issues and downtime, making your operation more efficient and profitable. To learn more about how the Nanoplas family of products can play a role in that strategy, contact us today.

by Nanomold Coating | May 29, 2020 | Recent Posts |
Easy Solutions to Splay Caused by Bleeding
Undesired bleed out in injection molding can be caused by—and lead to—a number of problems. One of the most common injection molding defects caused by bleeding is splay, which is often the result of an over-lubricated mold
Syn-Lube™, which breaks down differently than other greases and helps eliminate bleeding, when applied properly, could be the solution to any issues you’re experiencing with splay.
What is Splay?
Silver or white streaks appearing on the surface of the part often indicate splay in injection molding. Several other defects, like scuffs, flow lines, surface scratches, delamination from contamination and flaking, can resemble splay, so it’s important to determine the cause of the streaks as the first step in troubleshooting.
When the cause is from bleeding, you’re probably looking at splay, potentially from a mold with too much lubricant or grease.
How Bleeding Can Cause Splay
If the splay shows up immediately after getting the mold from the tool room, it’s likely the result of too much grease being applied to the mold. When a mold is over-lubricated, grease from the lifters and ejector pins may bleed onto the surface of the part, which then leave the silver or white streaks indicative of splay.
Sometimes, grease can get trapped in the mold inserts, which also leads to bleeding out.
More is not better when it comes to lubricating a mold, so it’s important to know how to properly apply a grease (see bottom of the page for instructions).
Using Syn-Lube to Mitigate Bleeding
The proper application of any lubricant is essential. Even better: the proper application of Syn-Lube. Syn-Lube high-performance synthetic grease lasts 10 times longer than competitor products and also doesn’t break down like other greases.
Other greases turn to oil at higher temperatures, which can then lead to bleeding into mold cavities. Syn-Lube is a full synthetic, food-grade grease that can be applied very thinly and will not break down with heat like other greases.
If you’re having issues with splay caused by bleed out in injection molding, try Syn-Lube. Applied properly, it will last longer and resist breakdown into potential bleeding.
Order or learn more about Syn-Lube.

by Nanomold Coating | May 22, 2020 | Recent Posts |
Coronavirus-related restrictions are beginning to ease up in Michigan and other states, so many sectors are getting back to work. Manufacturing is notably among them, and by extension, plastic injection molders. With employee safety top-of-mind, many plastic injection molders, whether voluntarily or by legal decree, are limiting the number of people that can be on the floor each shift. This likely means less operators working at any given time, so there’s more pressure to maximize production with the staff you do have.
Getting back up and running as quickly as possible and minimizing downtime will be crucial as plastic injection molding for manufacturing not only returns, but ramps up. Be ready and make the most of your workforce by taking this advice to speed startup and cut downtime.
Expedite Manufacturing Startup
There are many factors that could impede your ability to start up quickly, but most of them can easily be resolved.
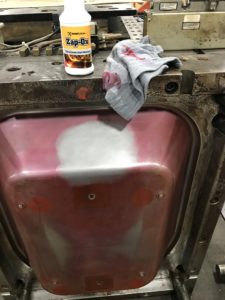
- If your plastic injection molds are rusty due to improper shutdown, clean them with Zap-Ox™. Without scrubbing, Zap-Ox will remove rust, oxidation, build up, weld discoloration, and more.
- If a hasty shutdown has left your mold dirty, use the Nanoplas cleaner that meets your needs. All of our cleaners have a stronger spray and chemical composition, so you can clean your molds quicker without having to wipe with a rag, preventing dirt and grime from being pushed back into the metal, and saving time.
- If you over-applied a rust preventative because you didn’t know how long your molds would be in storage, or have an excessively thick application of rust preventative, start by using a Nanoplas cleaner. Going forward, use Mold Guard™, Mold Guard Green™, or Safe-T-Guard™ which are thin and truly dry rust preventatives that don’t allow corrosion to penetrate, and can be molded through at startup.
Reduce Machine Downtime
If your plastic injection molds aren’t running, that means you aren’t producing. Keep them in service and working efficiently by avoiding these common issues.
- Over-applying grease to make it through a run, because your grease is breaking down with heat. You’re likely trading one problem for another — you’re not coming up short, but you are experiencing grease bleeding into the mold cavities. Either Nanoplas grease will solve both issues. Our greases don’t break down, so there’s no bleeding. They also remain on the surface longer, extending production up to ten times longer than PTFE lubricants, so you don’t have to stop to reapply. In fact, Syn-Lube helped one manufacturer go from daily to weekly applications, and 1,000-1,500 parts per day to 24,000 parts.
- Excessive mold release build up. With efficiency being so important due to fewer operators and machine up time, making sure the molds do not have to be shut down for any reason is critical. Excessive mold release build up can lead to temporary shut down for cleaning. Nanoplas coatings and release sprays don’t build up.
If you’re experiencing any of these issues as you and your team return to work, we encourage you to give our products a try. And if you have any other problems related to plastic injection molding that aren’t noted above, don’t hesitate to contact us. We’ve likely heard it or seen it, and solved it before, and will happily do the same for you.

by Nanomold Coating | May 15, 2020 | Recent Posts |
Medical supplies. Food. Due to COVID-19, both are in extremely high demand and will be for the foreseeable future, making medical- and food-grade plastic injection molding extremely busy industries.
How busy? Back in March, Forbes reported that the Director General of the World Health Organization called on global manufacturing of medical masks, gloves and goggles to increase by 40%. Also critical, as the same article noted: nylon-plastic swabs for testing kits, plastic vials for testing kits, and ventilators. Fast forward to early May, when vaccine developments started circulating. As the New York Times noted, more than 300 million people may need a coronavirus vaccine in the United States alone, making the production of the items necessary to deliver a vaccine extremely essential.
Equally in demand is food-grade packaging. In the midst of COVID-19, it all ties back to safety. Single-serve products help minimize cross-contamination. Plastic-contained bites keep the virus on the surface of the container, minimizing the risk of coronavirus getting into the food and therefore into someone’s body. Restaurants are only open for carry-out to promote social distancing, requiring appropriate to-go containers.
All this adds up to an increased need for medical- and food-grade plastic injection molding. To step up and help meet this demand, there are three things you and your team can focus on: production efficiency, scrap reduction and startup.
Maximizing Injection Molding Production
To make your runs as productive as possible, you need to release as many products as you can while minimizing downtime. Applying a nano-thin coating when the mold is out of the press, like HCF™ Heat Cure FDA Compliant, is a good first step. It offers extraordinary release, up to 300,000 cycles, and eliminates the need for traditional mold releases that build up and require shut down for cleaning.
Minimizing Scrap
If you use a grease that doesn’t break down, you’ll significantly minimize, and possibly even eliminate, scrap from bleeding into the mold cavity, injector pins, and other areas. Applied correctly, Syn-Lube™ (high temperature, high performance, synthetic grease) and Cera-Lube™ (high performance, nano ceramic grease) mitigate bleed off. Both remain on the surface longer than PTFE lubricants, extending production time up to ten times longer. In fact, Syn-Lube helped one manufacturer go from 1,000-1,500 parts per day, to 24,000 parts, with the product lasting weekly versus daily.
Speedier Startup
When it comes time to store your molds, use a dry rust preventative, like Safe T Guard™. Unlike other rust preventatives that claim to be dry, Safe T Guard truly is, so it won’t break down grease and can be molded through at startup, getting your production up and running faster and reducing scrap significantly.
If the onset of COVID-19 and related quarantine orders didn’t give you time to properly store and maintain your molds, a cleaner like Zap-Ox™ will have them back in operating form ASAP. Zap-Ox cleans gassing and burn marks, buildup, and more with little-to-no scrubbing, saving maintenance and downtime.
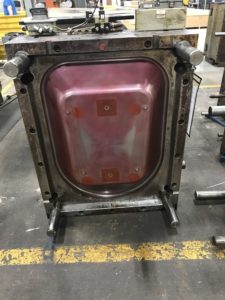
Before using Nanoplas Zap Ox
Note that all Nanoplas products mentioned above are FDA-compliant or NSF-registered, making them appropriate for medical and food-grade plastic molding.
Whether you increase production by focusing on one, two, or all three of the areas discussed, or are trying to maintain the same output with less staff due to health and safety measures, we here at Nanoplas want to help, so don’t hesitate to contact us. We’re happy to provide a free sample, product recommendation, or answers to any questions you might have.

by Nanomold Coating | Apr 30, 2020 | Recent Posts |
This year’s plastic injection molding trends look to continue several of the big initiatives from 2019 in some exciting ways. As companies consistently strive to improve in all aspects of their businesses, increased efficiency and reduced downtime remain two of the most important benefits.
Moving into 2020, we see a lot of improved technology, software and even thought processes that will help companies achieve their goals. Here are five plastic injection molding trends to look for in 2020:
1. Bio-Plastics and Environmentally Friendly Additives
Companies in every industry—but particularly plastics—are always trying to reduce the environmental impact of products and operations. This year, we expect to see a lot more bio-resins made from renewable resources (plant and vegetable extracts like corn or sugarcane) that are far safer for disposal and also more energy-efficiency in manufacturing.
Much of this trend is being driven by packaging. As companies look to reduce their environmental footprints, they’re seeking better packaging solutions, which is helping drive the increase in bio-resin use.
In a related trend, we’re seeing a push toward making conventional thermoplastics biodegradable. Adding metal compounds to the plastic leads to oxidation, breaking down the plastic and allowing microorganisms to do the rest. Environmentally friendly additives to traditional plastics along with bio-plastics are going to have an impact on the industry as a whole and, of course, on the environment.
2. Automation
When we talk about the automation and plastic injection molding trends for 2020, we’re specifically referencing software. Improved software and technology, which will only continue to advance, will allow manufacturers to save time, reduce waste and increase throughput.
Being able to analyze designs and plastic flow through molds will mean parts can get into production quicker as the time required for the testing and refinement phases is drastically cut.
Programming is being simplified, maintenance is becoming more efficient, cycles are getting faster and downtime is being significantly reduced. With better, more thorough control of the entire process, software automation is going to improve production throughout the industry.
3. Reinforced Plastic Materials
One of the big trends in 2019 is going to continue through 2020 and beyond as the automotive and aerospace industries seek the just-as-strong-but-not-as-expensive solutions that are also gaining traction in the medical industry and with the military due to the proven durability of the materials.
Plastics reinforced with metal, glass, carbon and graphite substitute for what used to be metal parts. The weight of the reinforced plastics is similar if not less, there is no decline in strength or function, and the cost savings can be huge.
4. Lightweight Materials
As reinforced plastics are already replacing exotic materials with parts that are of comparable or lighter weight, there’s an increased demand in less weight in general. In cars, particularly electric and hybrid models, less weight means better gas mileage or longer battery life, so developing lightweight injection molding products continues to be in high demand.
In other industries, the benefits may be less obvious but are still notable. Lightweight medical uses like joint replacements and stents will dramatically benefit patients, but even the improvements in tools and equipment can increase the efficiency (and costs) in healthcare
5. Sustainability
In any type of manufacturing, sustainability remains important and efforts to improve persist. In injection molding, in addition to bio-resins and eco-friendly additives, efforts will continue to reduce waste and enhance recycling.
We’re going to see a larger focus on using as many recyclable materials as possible—likely with goals of 100%—throughout the injection molding industry. Since plastics have always been under additional scrutiny, we can expect even more motivation from manufacturers looking to improve their environmental footprints.
Nanoplas products are designed to reduce your costs through cutting downtime and increasing efficiency. With many of the latest plastic injection molding trends based on precisely those goals, our products will help you further embrace whichever trends you choose to focus on this year and beyond.
by Admin | Nov 13, 2019 | Recent Posts |
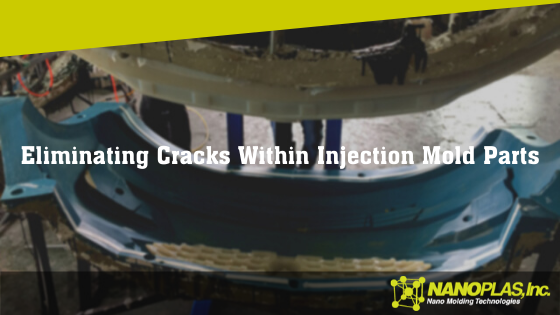
What Is Cracking in Injection Molding?
When a part is physically fractured or broken, you’re experiencing cracking. Cracks usually occur due to post-molding conditions, but when troubleshooting cracking, you want to know exactly when the cracking is happening as it will help you efficiently address potential issues and ultimately solve the problem.
Troubleshooting Cracks
In addition to post-molding conditions, cracking can be caused by a number of process settings, including second-stage pressure, melt temperature, residence time in barrel, ejection, part removal, operator error, mold breakaway and gate seal.
| Molding Process | Mold | Machine | Material |
| High second-stage pressure | Undercuts | Overheating | Moisture content |
| Melt temperature | Sharp corners | Lack of process control | Contamination |
| Residence time in barrel | Lack of draft | Regrind |
| Ejection | Lifter or slide corners |
| Part removal |
| Operator |
| Mold breakaway speed |
| Gate seal |
Table 24.1 Cracking Troubleshooting Chart, found in Injection Molding Advanced Troubleshooting Guide: The 4M Approach (p. 224)
How to Eliminate Cracking in Injection Molding
While cracks often occur post-mold, identifying the underlying issue is extremely important in being able to prevent cracking from happening. Check the part design—are there areas with sharp corners that act as stress risers and initiate cracks? If so, adding more radius to those areas can alleviate the stress and thus the cracks.
During the molding process, you could be facing high second-stage pressure, causing the material to stick which can lead to cracks when the mold opens or during ejection. A high melt temperature or improper residence time in the barrel could degrade the part and make it susceptible for cracking during ejection.
Since cracking usually occurs during ejection, it’s important to determine if the ejection itself is causing the issue or if it’s another issue that leaves the part vulnerable to ejection. Stop the mold process prior to ejection and look for cracks. If you see them, you know you have another issue. If there are no cracks, eject the part and check again. If you see cracks this time, you know there’s an ejection issue.
Nanoplas mold-release sprays are invaluable when it comes to ejecting parts and can be a tremendous help if you’re experiencing cracking.
If the part shows no cracks after ejection, it could be a part-removal issue or even an operator error. Something as simple as an operator handling the part could lead to cracking, which generally means there’s a design flaw that needs to be addressed. Simple handling of a part shouldn’t lead to cracking.
Cracking is a troublesome issue, but it can give you a lot of necessary information as to what needs to be improved to eradicate the problem.
Want to learn more? Check out these other great articles that solve common injection mold issues:
Source: Injection Molding Advanced Troubleshooting Guide: The 4M Approach by Randy Kerkstra and Steve Brammer.